Archive for the 'Mac tips & tricks' Category

Copy and paste the full path of a file in the Finder

Friday, July 27th, 2007

Finder iconThis is a handy trick that I use from time to time. Say you’ve selected a file or folder in a Finder window, and you want to copy the full path to that file or folder as a text string – for pasting into an email or a script, for example. Here’s how:

  1. Open a Terminal window.
  2. Drag the file or folder to the Terminal window. (The full path appears in the window.)
  3. Select the path in the Terminal window, copy it, and paste it into your email or script.
  4. Close the Terminal window.

The only slight snag is that, if your file or folder path contains spaces, the spaces get escaped with ‘\’s in the Terminal window.

If the escaped spaces bug you, or you often want to copy the path to a file, check out the catchily-titled FilePathToClipCMPlugin. Download and open the .dmg, drag the FilePathToClipCMPlugin.plugin file to ~/Library/Contextual Menu Items, and restart the Finder (Apple menu > Force Quit, then choose Finder in the list and click Relaunch). You can now right-click any file or folder and choose FilePathToClip! to copy it to the Clipboard. Works a treat.

(PathSnagger does a similar thing, but sadly it doesn’t have a stable Universal Binary version yet so I can’t test it.)
Finder: Working effectively in Column View

Friday, May 18th, 2007

Finder’s Column View is a bit of a black sheep amongst many Mac users, who tend to eschew it in favour of the more traditional icon and list views. However, Column View has its uses. It lets you see exactly where you are in your folder hierarchy, and it’s great for quickly drilling down through a deep folder structure, as you only need to single-click a folder to open it. You can also use it to quickly preview items such as movies and images.

Here I’ll share a few tips for making Column View a more pleasant experience.

Smart column resizing

One annoying quirk of Column View is the way that long file and folder names get rudely cut off.

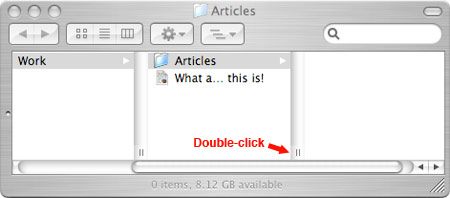
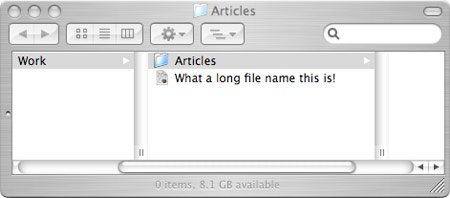
You probably know that you can drag a column’s resize handle – that little double bar at the bottom of the column’s vertical divider – to the right to expand a column and view your full file and folder names. But did you know you can double-click the handle to automatically “maximize” the column to fit the width of your longest file or folder name?

Long filename truncated in Column View

Maximized column view

Changing default column widths

Talking of resizing columns, you can stretch or shrink all the columns in the Finder window at once by Option-dragging the resize handle of one of the columns.

Even better, Finder remembers this width when opening new Finder windows; Option-drag your columns nice and wide, and they’ll stay that way for evermore.

The same is true with the file selector dialog used when opening or saving files in applications; in this case, Mac OS remembers the column widths on an application-by-application basis. For example, open a file in Firefox with File > Open, and Option-drag a column handle in the file selector to change the width of the columns. The next time you open or save a file in Firefox, the file selector retains your chosen column width.

(more…)

Keep your secrets safe: securely delete your files

Wednesday, May 16th, 2007

You probably know that dragging a file to the Trash icon doesn’t actually delete the file; to do that, you need to empty the trash by:

  • right-clicking the Trash icon and choosing Empty Trash
  • choosing Finder > Empty Trash, or
  • pressing Shift+Command+Delete while in the Finder.

However, you may not know that emptying your trash doesn’t delete the file either! Like most operating systems, Mac OS merely deletes the pointers to the file’s data on your hard drive; the data remains, and is recoverable if you know what you’re doing (for example, if you’re a hacker looking for credit card numbers!).

Really emptying the trash

Luckily, Mac OS provides a way to not only delete the pointers to the files in the trash, but also to overwrite the files themselves with garbage data. To do this, switch to the Finder and choose Secure Empty Trash from the Finder menu. It may take a while to overwrite all the data. Once done, your deleted files really are history.

Apple has a help page about deleting files and using Secure Empty Trash.

Wiping the whole disk

If you’re selling your Mac and you’re extra paranoid, you may want to wipe all the data on your disk beforehand. You can do this using Disk Utility’s secure erase options. More information in this Apple document. The truly hardcore will want to choose the 35-Pass Erase option, which takes forever, but makes the data nearly impossible to recover using current technologies.

Enjoy your privacy!

Displaying images in the right order in Preview

Wednesday, May 9th, 2007

This is one of those tricks that you rarely need, but when you do need it, it really saves tearing your hair out!

You probably know that Preview lets you view multiple images in a single Preview window, with each image thumbnailed in the drawer. (To do this, simply multi-select all your images in a Finder window, and hit Command-O to open them.) Preview helpfully sorts the images in the drawer alphanumerically by filename (by default). This is a really handy feature, as it means that you can open, say, 100 images without causing 100 Preview windows to appear!

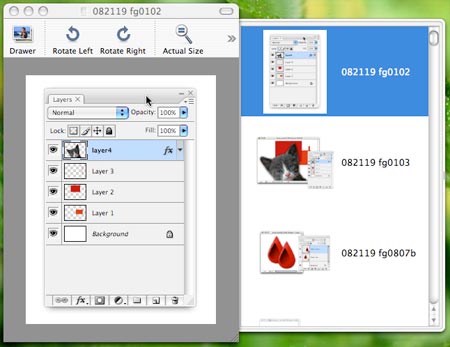
This is all very well, but occasionally Preview displays the images in the wrong order in the drawer. (This happens in Mac OS 10.4.9 – the latest at the time of writing – and I’m pretty sure it affects earlier versions too.) It seems to happen pretty much at random, but I’d hazard a guess that it’s something to do with the way Finder passes the filenames to Preview. You can see the problem in the screenshot below – the third image should be fg0104, not fg0807b:

Preview showing files in the wrong order

This is frustrating if you’re viewing a lot of images, and you need to view them in the correct order. For example, in the above screenshot I’m previewing hundreds of figures for a Photoshop book I’m writing, so I need to make sure they’re all there in the right sequence. (more…)

A handy, free colour picker

Sunday, May 6th, 2007

If you build websites, you’ve probably run into situations where you need the hex colour value of a pixel in a Web page. Sure, you can grab the browser window using Grab, save it out as a TIFF file, open that file in Photoshop, then use the eyedropper tool, but there’s a much easier way.

Pipette is a simple, free Mac app that reports the hex value of a pixel anywhere on your screen. Simply drag the eyedropper across to the pixel, and release. Pipette displays the hex value, pre-selected and ready for copying and pasting into your Web editor. Job’s a good-un.

Mail: How to display received times in the message list

Saturday, May 5th, 2007

This one caught me out the other day. I suddenly noticed that my Date Received column in Mail was only showing the dates, not the times. I could have sworn it used to show the times as well!

I hunted around in the Preferences but couldn’t find any option to display times as well as dates.

Eventually the penny dropped. The solution? Click the right edge of the Date Received column header, and drag to the right to expand the column. The times magically reappear! Mail cunningly displays just the date if the column is only wide enough for the date; make the column wider, and it has room to display the time as well.

(As you might imagine, the Date Sent field behaves in the same way.)

A nice UI touch, but it stumped me for a while there! Maybe I just needed more coffee…

Installing Photoshop CS3 on top of CS3 Beta? Beware!

Friday, May 4th, 2007

I’ve been using Adobe’s beta version of their new Photoshop CS3 software for the last few months. It expired the other day, so I shelled out for the full retail version. However when I tried to install from the CD, I got this irksome message:

Adobe Photoshop CS3 cannot be installed because it conflicts with:
Adobe Photoshop CS3

Nice! So Photoshop CS3 conflicts with itself. That’s a good start. Righty-ho, I thought – let’s uninstall the CS3 Beta. Naturally I dragged the application to the Trash. WRONG! What you’re supposed to do is use the uninstaller, squirreled away in the Applications/Utilities/Adobe Installers/ folder. How obvious.

OK, so I did that – still didn’t install. Turns out the uninstaller does a pretty poor job at removing various stray CS3 files, and the CS3 installer is very intolerant of any CS3-related files it finds on your hard drive – or even on your backup drive, for that matter.

The solution is to remove all those stray CS3-related files. Handily, Adobe has produced a little script, along with an informative PDF file, to help with this. Download it here. Open the PDF file inside the disk image, and follow the instructions therein. I managed to get away with Method 1, without having to run the cleanup script. (Which is a good job, as running the script sounds scary, going by that PDF. Make sure you back up everything on your Mac first if you use the script method!)

Basically I opened these two folders in the Finder:

  • /Users/<user_name>/Library/Preferences
  • /Library/Application Support/Adobe

…then searched for “CS3” in those folders using the search box at the top right of the Finder window, then dragged the search results to the Trash and emptied the Trash. The CS3 installer on the CD then worked fine, and in ten minutes I was up and running with CS3.

I think the same general approach applies to the Windows version too.

Hope that helps someone! Again, make sure your hard drive’s fully backed up before trying any of this. More info on the subject here, and in this thread.

Sleep your iMac screen – instantly

Wednesday, May 2nd, 2007

In my continuing quest to find a way to instantly, reliably turn off the iMac screen and keep it off, I just stumbled across this little gem: Sleep Display. It’s a little utility – in application or widget form – that lets you sleep your Mac screen instantly. None of that “make it sleep in 1 minute” hassle – just open the app, and your screen instantly sleeps. Wonderful – and about bleeding time. 🙂 (Having said that, I like to lock my display first, so I’ll still probably use the “1 minute” trick – but I’m sure this app will be incredibly useful to some folks.)

Now we just need a way to keep the damn display off. I’ve abandoned the idea of running my DVD backups overnight in the bedroom – spinning up the DVD “conveniently” wakes the display – so I now have to run these during the day. Ah well.

Haven’t moved the iMac into the bedroom yet – that’ll happen in the next month once little Isaac outgrows his bassinet – so I’m not sure what else might cause the display to spontaneously wake in the middle of the night. With a bit of luck it was just the DVD. Time will tell.

Creating clean archive files

Monday, March 12th, 2007

As Mac users (and friends of Mac users) will know, Mac OS loves splattering hidden metadata files and folders throughout your directory structure. For example, open up a terminal and do an ‘ls -a’ of one of your directories, and you’ll probably see a .DS_Store file in there.

This is all very well when browsing the folder on your Mac, because Mac OS X sensibly hides these from view in the Finder. However try tarring or zipping that folder, sending it across to a Windows machine, then unzipping/untarring the archive file in Windows. You’ll see the .DS_Store file sitting there in Windows Explorer, in plain view. Even worse, if you zip a folder using Mac OS X’s “Create Archive” option, it creates another Mac-specific __MACOSX folder in there too, further cluttering up the archive for non-Mac users.

Naturally, Windows and Linux have no use for such files and folders; all they do is confuse matters for the poor users. This can be a bit of a problem when distributing zip files to hundreds of people, like we do on PageKits.com. Of course, it’s easy enough to write a shell script to recursively scan a folder and remove all these Mac-specific files and folders prior to archiving, but it’s still a bit of a pain.

So I was pretty chuffed to discover CleanArchiver the other day. It’s a nifty little archiving utility that removes those pesky Mac-specific items as it archives. All you have to do is drag your folder to the CleanArchiver icon in the dock, and it does the rest. It can create gzip, bzip2, zip and dmg files, and you can tell it which Mac-specific things to remove and which to leave in. Perfect for zipping up folders to send to your non-Mac-using buddies.

Not So Mighty Mouse

Thursday, August 24th, 2006

My Mac’s Mighty Mouse has packed up after 3 months of use. The scroll ball will no longer scroll “down” (it moves but has no effect) and every now and again the mouse pointer jumps all over the place. Back to Apple for you, Mr Mouse! I hope it has a 3-year warranty like the Mac…

Now I no longer feel that the Microsoft mouse I bought a month before my Mac was a wasted purchase! I’ve switched to it and, after getting used to it, I think I actually prefer it to the Mighty Mouse (despite the lack of left-right scrolling, which I hardly ever used anyway). And it has better acceleration than the Mighty Mouse too. 🙂

UPDATE 25 Aug: Woah! Turns out all I needed to do was clean the ball. Thought I’d search for “mighty mouse won’t scroll down” before calling Apple and found this helpful page. Tried cleaning the ball – now it scrolls down! 🙂 It wasn’t even particularly dirty (or at least didn’t look it). Very strange. Looks like Mighty Mouse is really a bit “sensitive” on the inside! 😉