How to fix iOS Mail ‘Cannot Verify Server Identity’ error with self-signed certificates
Since upgrading my iPhone to iOS 4.2.1 I continually received this annoying popup every time I sent or received email:

I use SSL for both sending and receiving email, and my mail server uses a self-signed certificate. It sounds like this is a common problem with iOS 4.2.1 and self-signed certificates. Some say it’s a bug, while others say it’s Apple’s intended behaviour with self-signed certs. One thing’s certain – it’s frickin’ annoying!
Anyway, after trying all sorts of things suggested in forums, including wiping my mail settings, rebooting, and so on, I finally came across the solution in this forum post. Here are the steps (slightly modified from Drarok’s post):
The steps assume that you already use Apple Mail to access your mail server via SSL, and that you’ve accepted the mail server certificates in Apple Mail. If you haven’t done this then the certificates won’t be on your Mac.
- On your Mac, open your Applications/Utilities folder, and double-click the Keychain Access app to open it.
- Find your mail server in the Name column. There may well be more than 1 entry. Find the entry that has “certificate” in the Kind column, and that has the most recent Expires date. This is the certificate you want. (You should see “This certificate is marked as trusted for…” in the pane at the top of the app.)
- Right/control-click the certificate and choose Export “(mail server name)”:

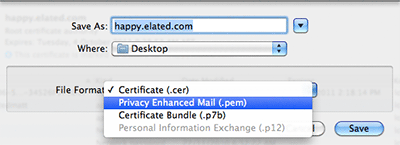
- In the File Format dropdown, make sure you select Privacy Enhanced Mail (.pem), NOT Certificate (.cer):

- Save the file on your desktop.
- Drag the file from your desktop to Mail to attach it to a new mail message. Send the email to yourself.
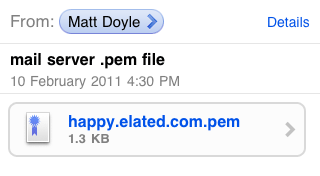
- On your iPhone/iPad/iPod touch, open the email. After no doubt getting the annoying popup again (don’t worry, this will be the last time you see it!), you’ll see the certificate attached as a little icon:

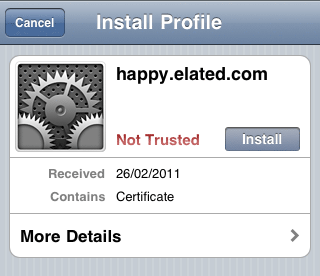
- Tap the icon. This will open an Install Profile window:

- Tap the Install button to install the certificate on your device.
- To get Mail on your device to pick up the new profile, you might need to quit and relaunch Mail. Double-click the Home button while on your home screen, then find the Mail icon. Hold your finger down on it till it wobbles, then tap the little red minus symbol to quit the Mail app. Then relaunch Mail from your home screen. (If you’re running anything earlier than an iPhone 3GS and don’t have multitasking, then simply reboot your device instead.)
You should now find that you can send and receive email without receiving the annoying popup. Woo!
By the way, if you ever want to delete the installed certificate, just fire up the Settings app and go to General. Scroll down, and you’ll see a Profile entry towards the bottom. Tap it, then tap the red Remove button.


March 10th, 2011 at 8:51 am
Worked like a charm — thank you! iPhone 4 ATT 4.2.1
March 17th, 2011 at 2:30 am
Thank you (and Drarok) a million times!!! This error has been driving me NUTS! Your solution worked perfectly. Yay!!!!!
March 18th, 2011 at 3:24 pm
Is there a solution for Windows users?
March 30th, 2011 at 8:30 pm
Not worked for me….. followed to the letter ….. but the mail doesnt seem to find the profile ?
Cheers
April 25th, 2011 at 8:49 pm
@Kramer @Stephanie – thanks, glad it helped!
@Karazy: I’m not sure, to be honest. Does Windows have some kind of certificate repository where you could export the mail server cert in .pem format?
@James: Sorry it didn’t work for you. Are you getting an error message of some sort?
November 29th, 2011 at 4:32 am
Pleased to say that this works on iOS5 as well.
Thank you so much for posting it.
December 1st, 2011 at 7:05 pm
@Pauli: That’s great to hear! Thanks for letting me know. 🙂
December 12th, 2011 at 12:53 pm
I was getting a certificate error while tryng to set up a yahoo email account on my ipod and the error was an incorrect date in my settings.