Archive for the 'Mac tips & tricks' Category
How to Schedule an Automator Workflow with iCal
Tuesday, May 11th, 2010
In my first Automator tutorial I showed how to build and run a simple Automator workflow.
In this tutorial you learn how to create a scheduled Automator workflow that automatically sends birthday greetings to people in your Address Book. Along the way, you’ll learn:
- How to use Automator to find contacts from your Address Book
- A really easy way to send birthday greetings with Automator, and
- How to schedule Automator workflows in iCal, so that they run automatically on a regular basis.
Ready to automate? Let’s get started!
Tip: You can click any of the screenshots below to enlarge them.
1. Create the workflow
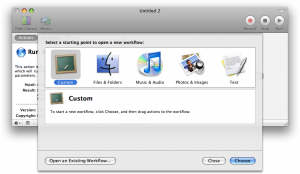
I showed the basics of starting Automator and creating a workflow in my last tutorial. As before, start Automator then click the Custom icon to create a custom workflow, then click Choose:
(more…)Automator Tutorial: Getting Started with the Mac OS X Automator
Monday, July 27th, 2009 One really nice thing about Mac OS X is the ease with which you can automate tasks. This comes down to AppleScript – an easy-to-learn scripting language for getting apps to do things – and Automator, a drag-and-drop tool for creating a series of automated actions, known as a workflow.
In this beginner Automator tutorial I’ll walk you through the process of creating a simple Automator workflow, from start to finish. The workflow, called “Zip and Send”, will zip up selected file(s) and automatically email the resulting zip archive to an address you specify.
Opening Automator
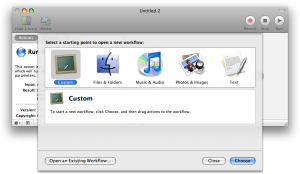
To run Automator, open your Applications folder in the Finder and double-click the Automator icon. When Automator starts, you can choose a starting point for a new workflow:
These options just provide basic templates to get you going. For now, just choose the Custom icon, as shown above, then click Choose. (more…)
Mac Terms Explained: A Glossary of Mac Terminology
Wednesday, July 1st, 2009![]() Are you new to the Mac, or thinking of diving into the world of Macs? The following is a list of technical Mac terms that you may find handy. I came across most of these terms myself when I first bought a Mac, so I thought it’d be useful to gather them together into this glossary.
Are you new to the Mac, or thinking of diving into the world of Macs? The following is a list of technical Mac terms that you may find handy. I came across most of these terms myself when I first bought a Mac, so I thought it’d be useful to gather them together into this glossary.
I hope you find it useful! If you’d like to see a term added to the list – or you think one of my definitions needs correcting – please let me know in the comments below. Thanks! 🙂 (more…)
Organize your Mac: 5 great tips
Wednesday, May 27th, 2009When I first got my shiny new iMac everything was neatly organized: I had a nice clean Desktop and Home folder, my Dock was minimal, and my hard disk wasn’t full of crud. A mere week later the Mac was chaos – files everywhere, cluttered Desktop and Dock, and I couldn’t find anything!
I quickly learned that, in order to be productive on my Mac, I was going to have to get organized. Here are some simple techniques that I’ve found helpful for keeping my Mac data ship-shape.
1. Organize your files and folders
![]() I do struggle at times to keep my legions of files and folders organized (in fact only the other day it took me over an hour to find an old document I created 3 years ago!). Here are some tricks that I’ve found helpful:
I do struggle at times to keep my legions of files and folders organized (in fact only the other day it took me over an hour to find an old document I created 3 years ago!). Here are some tricks that I’ve found helpful:
- Keep your Desktop and Home folders clean. Avoid putting any files or folders on your Desktop – not only is it visual clutter, but it results in a disorganized mess! Similarly, don’t dump files directly in your Home folder. Instead, create subfolders in your Documents folder (or wherever is convenient) and put files in there.
- Tell Firefox to use your Downloads folder. While Safari plays by the Downloads folder rule, Firefox dumps downloaded files on your Desktop by default. Not good. Go to Firefox > Preferences > Main > Save Files To, click Choose, then pick the Downloads folder in your Home folder.
- Organize your Finder sidebar. The left-hand sidebar in each Finder window gives you instant access to files and folders with a single click. Make the most of it by adding the files and folders you use most often. To do this, just drag a file or folder from the main Finder window to the sidebar. While you’re there, remove unwanted files and folders by dragging them away from the sidebar.
- Make important folders stand out. You can assign a colour to a folder by hitting Command-I then clicking a colour in the Label section of the Info dialog. Alternatively, give a folder a custom icon. Find the image you want to use – whether on your Mac or on the Web – and copy it. Now select the folder, hit Command-I, click the folder icon at the top-left of the Info dialog, and hit Command-V to paste your image. (You can also grab ready-made icons off various sites.)
- Use Smart Folders. These work much like Smart Mailboxes in Mail. Smart Folders don’t actually contain any files, but they let you group files and folders together based on specified rules. This is handy if you want to access all documents on a given project in one place, for example. Find out how to create Smart Folders in Leopard.
- Use Spotlight comments. Spotlight does a pretty good job of finding files, but you can make its life easier by tagging files and folders. Select a file, hit Command-I, then add your tags in the Spotlight Comments field at the top of the Info dialog. The file will now come up in Spotlight searches for those tags. Good for grouping files by topic or project. (more…)
Mac Address Book tips: 5 more handy hints
Wednesday, March 11th, 2009![]() A few months back I listed 5 Mac Address Book tips. I’ve since discovered that there’s more to this little gem of an app than meets the eye! Here are 5 more tips and tricks to help you get the most from Address Book:
A few months back I listed 5 Mac Address Book tips. I’ve since discovered that there’s more to this little gem of an app than meets the eye! Here are 5 more tips and tricks to help you get the most from Address Book:
Removing duplicate contacts
If you’re as disorganised as me then you might often end up with more than one card for the same person (often with different phone numbers and email addresses in each card). If you have hundreds of contacts then finding and merging these duplicates manually can be a pain.
An easier way is to choose Card > Look for Duplicates. This automatically rummages through your contacts, identifying cards with the same name. You can choose to merge any identical cards, and also whether to merge cards with the same name but different contact details (the contact details from one card are added to the second and the first card is deleted).
You can manually merge cards too. Shift/Command-click the cards to merge, then choose Card > Merge Selected Cards. This is a safer approach as no contact details are overwritten (Look for Duplicates tends to overwrite one card’s field with the same field from the second card, which is a bit of a bug methinks – this is in Mac OS 10.5.6). (more…)
Mac troubleshooting: 10 quick tips for fixing your computer
Tuesday, January 13th, 2009Apple Macs are pretty reliable (as computers go) but they inevitably throw their toys out of the cot occasionally (usually when you’re trying to meet a deadline). While there are a million different things that can go wrong with a Mac – many of which require a lot of time and patience to fix – there are a few general steps you can take to try and identify or solve the problem.
Read on for 10 simple Mac troubleshooting tricks that you can try when your computer acts up. These are in approximate order of priority, so try the first suggestion first, and if it doesn’t work, try the next.
(Disclaimer: Although these tips are fairly innocuous, there’s always a chance that trying them might make things worse. Always make sure you have a backup of all your data before proceeding!)
1. Restart the Mac
The classic tech support answer. If your Mac is behaving strangely then the first thing to do is shut it down, wait a few seconds, and turn it back on again. This resolves a lot of software (and temporary hardware) glitches.
2. Make sure your system and apps are up to date
Sometimes problems are caused by bugs in old versions of software. If you’re seeing a problem in a particular app, check to see if a newer version is available. Usually there’s a Check for Updates menu option under the menu with the same name as the app (e.g. iTunes) or under the Help menu.

To make sure your system software is up to date, choose Apple > Software Update. (more…)
Protect your kids (and your Mac!) with Parental Controls
Monday, December 15th, 2008![]() The other day, a friend of mine had an embarrassing experience that must happen to every parent at least once: His 8-year-old managed to use his Mac to Google an, ahem, “inappropriate” website. He asked me for advice.
The other day, a friend of mine had an embarrassing experience that must happen to every parent at least once: His 8-year-old managed to use his Mac to Google an, ahem, “inappropriate” website. He asked me for advice.
I suggested he made sure Google SafeSearch was enabled, and pointed out software such as NetNanny. Then I rummaged around in System Preferences and found that Leopard has some pretty comprehensive parental filters built in, in the form of Parental Controls. They look pretty handy for keeping your kid safe on the Internet, and also for preventing accidental damage to your applications and OS installation (kids being the curious creatures that they are).
Here’s how to use Parental Controls on your Mac.
Creating an account and enabling Parental Controls
The first thing to do is create a separate account for your child (if you haven’t already). As an administrative user, choose Apple menu > System Preferences, then click Accounts. Click the lock symbol at the bottom left of the dialog (if locked) and enter your password.
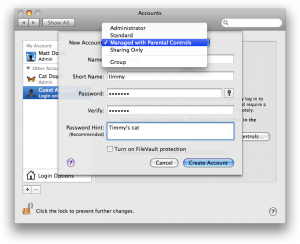
Now click the little + (plus) button below the list of accounts. In the sheet that appears, choose Managed with Parental Controls from the New Account drop-down list, and fill in the other fields:
Click the Create Account button to create your child’s account.
If your kid already has an account, simply select it in the Accounts list then select the Enable Parental Controls checkbox to the right of the list. (more…)
5 handy Address Book tips
Monday, November 10th, 2008Leopard’s Address Book is easy to use and, at first glance, appears pretty basic. However, scratch the surface and it has all sorts of neat features to improve your productivity. Here are just 5 ways to be more productive with Address Book.
Smart Groups
You probably know that you can organize your contacts into groups by clicking the + button at the bottom of the Group list to create a new group, then dragging contacts into that group.
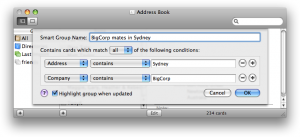
However, Address Book also lets you create Smart Groups. These work pretty much like Smart Playlists in iTunes. Choose File > New Smart Group, then specify your search criteria in the dialog that appears:
The Smart Group automatically updates its list of contacts whenever you add, remove, or edit contacts in Address Book. Select the Highlight the group when updated checkbox, and whenever a contact is automatically added to or removed from the group, Address Book highlights both group and contact in purple.
(By the way, if you hold down Option while a contact is selected in the contacts list, Address Book highlights the group(s) they’re in – including regular groups as well as Smart Groups – in yellow.)
Smart Groups are great for grouping all the people who work at a certain company, or who live in a certain town, for example. (more…)
How to turn off iTunes 8’s store arrows
Thursday, October 2nd, 2008If you use iTunes, you’ve probably spotted those little arrows in circles that appear next to certain columns in the currently selected track. When you click them, you’re taken to the album or artist on the iTunes Store:

If you remember, iTunes 7 and earlier gave you a Preferences option to turn them off. And rightly so – they clutter up the UI in my opinion.
However, for some bizarre (no doubt marketing-related) reason, Apple removed this option from the Preferences dialog in iTunes 8. Thanks guys. 😉
Fortunately, there’s still a way to turn the arrows off. Quit iTunes, open a Terminal window, and type:
defaults write com.apple.iTunes show-store-arrow-links -bool false
Now relaunch iTunes. The arrows will be gone. To turn them on again, type:
defaults write com.apple.iTunes show-store-arrow-links -bool true
Not so fast…
Before you turn the arrows off, though, you may be surprised to learn that they do, in fact, do more than just take you to the iTunes Store.
This post on macosxhints.com contains a couple of comments which taught me something new: You can actually Option-click an iTunes Store arrow to find stuff in your library. Option-click a track name column or album column arrow to get a list of all tracks in an album; Option-click an artist column arrow to view all tracks by an artist.
So those arrows are actually useful after all! In fact, by changing another hidden preference, you can swap the behaviour of clicking/Option-clicking:
defaults write com.apple.iTunes invertStoreLinks -bool true
Now clicking the arrows takes you to the album or artist in your library, while Option-clicking jumps to the Store.
Obviously, you can revert back to the original behaviour by typing:
defaults write com.apple.iTunes invertStoreLinks -bool false
And there you go! The hidden delights of those little arrows.
