Automator Tutorial: Getting Started with the Mac OS X Automator
 One really nice thing about Mac OS X is the ease with which you can automate tasks. This comes down to AppleScript – an easy-to-learn scripting language for getting apps to do things – and Automator, a drag-and-drop tool for creating a series of automated actions, known as a workflow.
In this beginner Automator tutorial I’ll walk you through the process of creating a simple Automator workflow, from start to finish. The workflow, called “Zip and Send”, will zip up selected file(s) and automatically email the resulting zip archive to an address you specify.
Opening Automator
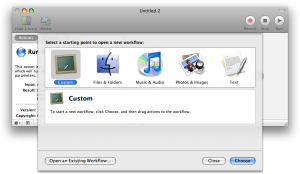
To run Automator, open your Applications folder in the Finder and double-click the Automator icon. When Automator starts, you can choose a starting point for a new workflow:
These options just provide basic templates to get you going. For now, just choose the Custom icon, as shown above, then click Choose.
About Automator Actions and Workflows
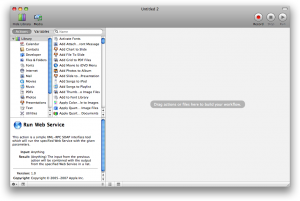
The Automator window contains an Actions/Variables area (on the left) and a Workflow pane (on the right):
There’s also a small bottom-left pane that describes each action or variable.
What are actions, workflows and variables? I’ll cover variables in another tutorial; here we’ll concentrate on actions and workflows.
Actions are simple tasks that Automator asks other apps to carry out, such as “New Folder” or “Pause iTunes”. You string actions together to make a workflow, which is a script of tasks for Automator to run. You can then save your workflow and run it whenever you like.
Many actions have an output (such as a piece of text or a file name) that is then passed to the next action as an input. This is indicated by a little arrow symbol between the 2 actions:

Building the Workflow
Here you’ll create a simple but useful workflow to zip up some selected file(s) and email the zip file to a specified email address. Follow these steps to create the workflow:
1. Add an action to create a temporary folder for the zip archive
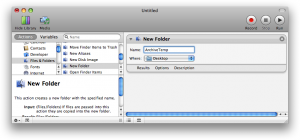
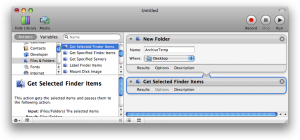
In the Actions/Variables pane click Files & Folders in the left-hand column, then drag the New Folder action in the right-hand column into the right-hand Workflow pane. Click the Name field in the action and type ArchiveTemp. Make sure Where is set to Desktop – this will create the ArchiveTemp folder on your Desktop:
2. Add an action to get the items selected in the Finder
With Files & Folders still selected in the left-hand column, drag the Get Selected Finder Items action below your previously-created New Folder action in the workflow. This action grabs the names of any selected files and folders in the Finder and passes them as input to the next action:
3. Add an action to remove the temporary folder from the selected items
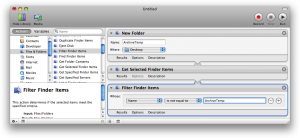
Unfortunately the selected items grabbed by the second action will also include the ArchiveTemp folder created by the first action, so you need to remove this folder from the list of selected items. You can do this with the Filter Finder Items action. As before, drag this action below the other actions in your workflow. Set the first option to Name and the second option to is not equal to, then type ArchiveTemp into the box:
4. Add an action to create the archive
Now you’re ready to add an action to create a Zip archive of the selected items. First though, you need to manually create the ArchiveTemp folder on your Desktop so you can tell the action where to save the archive. So right-click (or Control-click) your Desktop, choose New Folder, and name the folder ArchiveTemp.
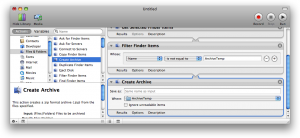
Now switch back to Automator and drag the Create Archive action into the workflow, below the other actions. Click the Where option in the action, choose Other from the pop-up menu and select the ArchiveTemp folder that you just created on your Desktop. Leave the Save as box saying Same name as input – this will name the archive after the selected file (if more than one file was selected, it will call the archive simply “Archive.zip”):
5. Add actions to send the email message
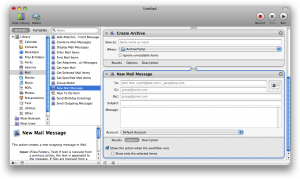
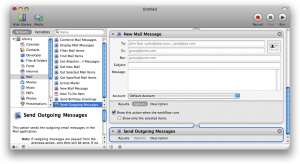
The next step in the workflow is to send the created archive file as an email attachment. Click Mail in the left hand column, then drag the New Mail Message action to the bottom of your workflow. Click the Options button at the bottom of the action to display the action options, then click the Show this action when the workflow runs checkbox. This will pop up a dialog prompting for the recipient and other details when the workflow is running:
The New Mail Message action takes the archive file generated by the previous Create Archive action, and attaches the file to a new email message.
To actually send the message, you need to use the Send Outgoing Messages action. Drag this action below the New Mail Message action in the workflow:
6. Add actions to remove the temporary folder
That’s the archive created and emailed. All that’s left to do now is clean up by moving the ArchiveTemp folder to the Trash.
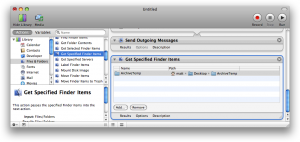
First, add an action to select the ArchiveTemp folder. Click Files & Folders in the left column, then drag the Get Specified Finder Items action to the bottom of your workflow. Click the Add button in the action, then in the dialog that appears choose the ArchiveTemp folder on your Desktop:
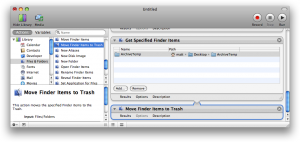
Finally, drag in the Move Finder Items to Trash action to delete the ArchiveTemp folder:
Testing the Workflow
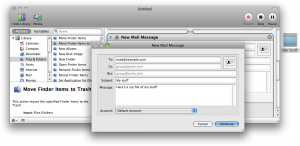
You’ve now created your workflow! To test it, first switch to the Finder and click a (reasonably small) file or folder to select it. Then switch back to Automator and click the top-right Run button. You’ll see Automator moving through each action in your workflow. When it’s time to send the email, you’ll get a dialog asking you to enter the email details – do this, then click Continue:
Automator now automatically composes and sends the email. Job done!
Saving the Workflow
The last step is to save your workflow so you can use it again later. There are a few different ways you can save workflows. In this example you’ll save your workflow as a Finder plug-in so you can run it straight from the Finder.
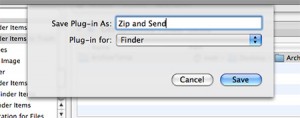
Choose File ⇨ Save As Plug-in, then make sure Finder is selected and enter Zip and Send. Click Save to save your workflow:
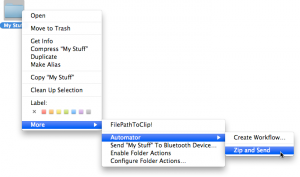
You can now easily zip and send any selected file(s) or folder(s) in the Finder. Select the item(s), then right-click (or Control-click) one of the items and choose More ⇨ Automator ⇨ Zip and Send:
All done!
I hope you found this Automator tutorial helpful. Let me know if you like it and I’ll write some more tutorials! 🙂


August 21st, 2009 at 1:31 pm
A very good tutorial on automator for the mac. Looking forward to more!
August 21st, 2009 at 9:33 pm
@Sludgester: Thanks – glad you liked it. I’ll write another one!
August 23rd, 2009 at 1:45 am
I added an empty the trash routine by doing the Record (and did the action manually). It worked as far as getting to the OK button to empty it but, then I get an error message.
The questions is how to empty the trash automatically at the end of the routine?
Thanks
August 23rd, 2009 at 1:17 pm
@BT: I think you need to create an action in AppleScript to do this (Automator doesn’t have an “empty the trash” action):
http://forums.macosxhints.com/archive/index.php/t-41477.html
How to create an AppleScript action for Automator:
http://www.mactech.com/articles/mactech/Vol.21/21.08/BuildingAutomatorActions/index.html
September 27th, 2009 at 4:27 am
Really nice walk through. I made mine a service under SL and added a rename finder item action to add the date to the archive. Works great.
mt
September 28th, 2009 at 7:16 am
@mysterytramp: great stuff, glad it helped! 🙂
October 8th, 2009 at 9:36 am
I am trying, unsuccessfully, to have a Keynote slide show automatically run when the computer comes on. I am in a retirement home and have created a nice slide show the weekly activities that runs on a G4 Mac connected to Comcast in-house TV channel. This play on the residents’ TV channel 33.
I want the Mac to shut down at night and on in the morning and the slide show to do likewise. Keynote and iTunes both open on startup but I can’t get the slide show to run automatically on startup.
In Automator I select “Open Keynote Presentations. Next I dragged the presentation file and dropped it into Automator. Test run did nothing. What am I doing wrong? David
October 14th, 2009 at 6:18 pm
@David: To have the Automator workflow run at login, save the workflow as an application (File > Save As, then choose Application for the File Format option), then add the application to Login Items (Apple menu > System Preferences > Accounts > Login Items).
Not sure why your workflow doesn’t work – it works OK for me. When you drag in your .key file Automator should create a “Get Specified Finder Items” action for it. Make sure this action is *before* the “Open Keynote Presentations” action in the list (you might need to drag the actions around).
Does that help?
November 9th, 2009 at 3:00 am
Greetings Matt
Thank you for the tutorial on Automator. Everything works as documented.
November 10th, 2009 at 8:02 pm
@Tim K: Thanks for the feedback – I’m glad the tutorial worked OK for you. More Automator tutorials to follow soon…!
November 20th, 2009 at 9:40 am
I customised a workflow to change location ( from ethernet 1 to 2) which meant :
Choose ‘custom’/Utilities/Watch me do/Record
then:
— Click the “Apple†menu.
delay 4.209687
set timeoutSeconds to 2.000000
set uiScript to “click menu bar item \”Apple\” of menu bar 1 of application process \”Finder\””
my doWithTimeout( uiScript, timeoutSeconds )
— 461264
delay 5.127981
set timeoutSeconds to 2.000000
set uiScript to “click menu item \”461264\” of menu 1 of menu item \”Location\” of menu 1 of menu bar item \”Apple\” of menu bar 1 of application process \”Finder\””
my doWithTimeout( uiScript, timeoutSeconds )
— Click the “Apple†menu.
delay 4.352003
set timeoutSeconds to 2.000000
set uiScript to “click menu bar item \”Apple\” of menu bar 1 of application process \”Finder\””
my doWithTimeout( uiScript, timeoutSeconds )
— Network Preferences…
delay 3.816005
set timeoutSeconds to 2.000000
set uiScript to “click menu item 4 of menu 1 of menu item \”Location\” of menu 1 of menu bar item \”Apple\” of menu bar 1 of application process \”Finder\””
my doWithTimeout( uiScript, timeoutSeconds )
— Select the row that contains “Built-in Ethernet 1, Self-Assigned IPâ€.
delay 3.223997
set timeoutSeconds to 2.000000
set uiScript to “click static text 1 of row 1 of table \”Services\” of scroll area 1 of window \”Network\” of application process \”System Preferences\””
my doWithTimeout( uiScript, timeoutSeconds )
— Click the “Advanced…†button.
delay 3.032023
set timeoutSeconds to 2.000000
set uiScript to “click UI Element 14 of window \”Network\” of application process \”System Preferences\””
my doWithTimeout( uiScript, timeoutSeconds )
— Click the “Renew DHCP Lease†button.
delay 1.672019
set timeoutSeconds to 2.000000
set uiScript to “click UI Element \”Renew DHCP Lease\” of tab group 1 of sheet 1 of window \”Network\” of application process \”System Preferences\””
my doWithTimeout( uiScript, timeoutSeconds )
— Click the “OK†button.
delay 1.591956
set timeoutSeconds to 2.000000
set uiScript to “click UI Element \”OK\” of sheet 1 of window \”Network\” of application process \”System Preferences\””
my doWithTimeout( uiScript, timeoutSeconds )
— Click the Ҡbutton.
delay 2.216038
set timeoutSeconds to 2.000000
set uiScript to “click UI Element 1 of window \”Network\” of application process \”System Preferences\””
my doWithTimeout( uiScript, timeoutSeconds )
on doWithTimeout(uiScript, timeoutSeconds)
set endDate to (current date) + timeoutSeconds
repeat
try
run script “tell application \”System Events\”
” & uiScript & ”
end tell”
exit repeat
on error errorMessage
if ((current date) > endDate) then
error “Can not ” & uiScript
end if
end try
end repeat
end doWithTimeout
………….
IOW,
Apple Menu
change location
select ethernet location
‘Advanced’
‘Renew DHCP Lease’
OK
CLose window
END RECORDING
but when I choose RUN, the mouse chooses Finder, Automator in the Finder menu, Apple Menu, then ‘Software Update’
So there’s a fracture between the script and the action
any ideas why?
pete
November 29th, 2009 at 3:40 am
Hi Matt, thanks for the helpful tute.
I want to know if it is possible to generate a workflow code to do the following.
1 – Open a text file
2 – Text file has 1 or 2 words with a paragraph (the word describes what is in the para)
3) Find specific words within the para, count them, write the count to a spreadsheet
4) Move to the next para, repeat.
If this can be made as a plug in to work with text edit is what I am intending to do.
I am a new Mac user.
Thanks much.
Best,
Raj.
November 29th, 2009 at 6:55 am
@pete: I’m not that familiar with AppleScript yet I’m afraid! Can anyone else help?
@Raj: Again, this sounds like something you’d want to use AppleScript and/or shell scripting for – not sure this level of detail is possible with Automator alone. I may write some AppleScript tutorials soon… 🙂
November 30th, 2009 at 5:49 am
Thanks Matt, will periodically keep checking.
November 30th, 2009 at 9:39 pm
Thank you. Excellent tutorial – I wish Apple’s were as good.
December 1st, 2009 at 6:35 am
@Derrick: Thank you, I’m flattered 🙂
December 5th, 2009 at 7:20 pm
Great Tutorial. Works very well. However if you make a couple of changes one does not need to create a new ArchiveTemp every time one wants to zip and send:
All of the following are actions found under Library- Files & Folders. After Send Outgoing Messages, add Get Specified Finder Items and on Name chose your ArchiveTemp; then add the step Get Folder Contents and finally add Move Finder Items to Trash.
Happy automation…
December 7th, 2009 at 4:00 pm
@raccbm: Thanks for the suggestion! That certainly saves a couple of steps. The reason I delete the ArchiveTemp folder at the end of the action is so that it doesn’t clutter up the user’s Desktop, but I guess you could create ArchiveTemp somewhere less conspicuous and leave it there…
December 11th, 2009 at 10:20 am
Thank you for that intro on automator. I was finding that application intimidating and now it has become more friendly. It is hard to find user friendly info on how to use it.
I will try to work on a script that will allow me to save .TIFF image files (16-20MB) in .JPEG downsized to 1000×1000 max pixels and less than 1MB usable for web purposes using PSE6.
Well done.
Richard
December 14th, 2009 at 2:01 pm
@Richard: You’re welcome! If you need to automate Photoshop Elements with Automator then you might find the Photoshop Elements Action Pack useful: http://www.completedigitalphotography.com/?p=445
Alternatively you may simply be able to use the Scale Images and Save as JPEG actions in Automator itself (inside the Photos actions group).
January 28th, 2010 at 8:22 am
Thanks for the Tutorial Matt, i’ve been aware for a long time that automator can make a lot of things easier, but i’ve just never gotten into it.
my question is this: is it possible to create a workflow that allows you to choose a *destination* as a variable? so, i am trying to create a workflow that asks me to select a file, and then asks me where to put it, and then sends an email out with the date/time and the file path.
i’m just getting into automator, and i haven’t yet stumbled across the way to do this.
thanks again!
February 2nd, 2010 at 11:06 am
@jason: Glad you liked the tutorial. 🙂
If you use the Move Finder Items action, for example, then you can click Options, then select the “Show this action when the workflow runs” option. This then pops up a file chooser dialog when the workflow runs. However I’m not sure how to get the resulting path into a variable – the “Set Value of Variable” action sounds like it should do it, but I can’t get it to work. Hmm… If I find a way I’ll let you know!
February 4th, 2010 at 5:40 am
right! this is where i’m stuck. yes, if you find anything please let me know! also i find the answer i’ll post it here.
thanks again
-j
February 23rd, 2010 at 11:02 am
Does not let me save as a plugin
February 25th, 2010 at 2:06 am
Hi Matt,
I need your help. I run a small company where I call some customers everyday and record them. I manually create a folder and name it today’s date (Ex: 02-24-10) and save the calls in that folder. again tomorrow I do the same thing by creating a folder of tomorrow’s date. My question is, is there a way to create a folder and naming it that particular date.
Thanks in advance.
🙂
March 1st, 2010 at 6:35 pm
@Mohan: Try this: http://www.macworld.com/article/46978/2005/09/automatorcustomfolders.html
March 16th, 2010 at 6:28 am
Hello, I was at a training today and they had an electronic sign in sheet. We had to type in our name and then were prompted to smile upon where photo booth did its 3 second countdown and our picture was taken. (I think it was photo booth). Once everyone was signed in, during downtime, they played all the pictures…they looked like they were on a polaroid snapshot picture and the names were on the bottom of the picture. Do you know how they created this?
March 16th, 2010 at 9:19 am
I’ve figured out that I need to use automator to set this up; however, I cannot figure out how they had the names, that were taken from the sign in, and placed them on the snapshot of the picture. Every time I run the slideshow from iPhoto ’09 it only has a few themes to choose from; I can’t seem to find the one that makes the pics look like polaroid pics. Any help would be greatly appreciated. Thanks.
March 19th, 2010 at 2:14 pm
@Dana: Maybe they used Photoshop to add the polaroid effect by hand? Hard to tell. These links may help with the automated photo taking though: http://www.dragosroua.com/automating-photo-booth-and-iphoto/ and http://www.dailymotion.com/video/x2uqwf_apple-automatic-photo-booth_tech
September 23rd, 2010 at 2:05 pm
Matt,
Nice tutorial. I’m trying to figure out if what I would like to accomplish is even possible. I have access to a series of books for school, which I can print, but I have to do so chapter by chapter. With 20+ books to print, and upwards of 100 chapters per book, that’s just ridiculous.
So, I would like to create a workflow in which I could point Safari at a page, have it open individual chapter links, click on the “print” button on the webpage, then save as pdf in the print dialog box, direct it to deposit it in a folder and then string the pdfs together.
Possible? Suggestions for making it happen?
October 17th, 2010 at 11:13 pm
Hi, I have an Western Digital Harddrive with an encryption and unlock software on it.
I want to write an script, that automatically unlocks the drive each time it gets connected.
The script should detect, that the harddrive is attached, also directly on startup. The opens the Program “Unlock” on the harddrive, automatically type in the password and unlock the harddrive. Any ideas?
October 18th, 2010 at 12:09 pm
@Valentin: Your “encryption and unlock software” will need to either support AppleScript or have a command-line interface for the lock/unlock commands. You’ll then be able to automate it via Automator (or a shell script).
Of course, storing the password in an AppleScript/shell script will sort of defeat the purpose of having an encrypted hard drive. 😉
January 9th, 2011 at 2:58 am
Hey Matt!
Nice tutorial. I would get my hands on this one when time permits. Is there a way for automator to say when I click on or press a couple of key combinations, a pop up box will appear wherein I can select a proforma document and paste it automatically into Pages?
January 19th, 2011 at 3:11 am
How would I create an automator script to launch a file? I have files that I use on a regular basis buried in directories. I would much rather right click on the Finder window and launch them.
January 21st, 2011 at 1:22 pm
@Christopher: I don’t think there’s an Automator action for that – you’d need to create it in AppleScript.
@Jason: I don’t understand your question. Why not just select the file and hit Command-O to open it?
March 10th, 2011 at 8:51 pm
Excellent no-frills tutorial. Thanks.
March 11th, 2011 at 1:06 pm
@alberto: Thanks for your comment – glad you found the tutorial helpful 🙂
March 17th, 2011 at 11:32 am
Is there a way to create a new folder and give it the name of today’s date using the variable Today’s Date? Cannot get it to work and get an error “the file 11 doesn’t exist.
November 1st, 2011 at 10:58 pm
I use a web based software that downloads files to the downloads folder before we can print – hence I end up with multiple files named print.do and print-1.do and so on.
I would like to delete these files from the downloads folders prior to shutdown. Any suggestions on creating this workflow?
Thanks…